DIY Memory Box
This project was plucked from Pinterest, something I've been
spending WAY too much time on lately.
I have a mild obsession with calendars.
I have a bunch of old ones lying around the house taking up too much
valuable storage space in my tiny house.
This memory box can hold years of memories in a small compact space. It's a daily calendar that can be reused every year and gets better the longer you use it. There’s a card for each day. You write the year and something fun that happened that day like adopted two kitties or bought a new car. Imagine all the memories one can build up in 10 years!
This memory box can hold years of memories in a small compact space. It's a daily calendar that can be reused every year and gets better the longer you use it. There’s a card for each day. You write the year and something fun that happened that day like adopted two kitties or bought a new car. Imagine all the memories one can build up in 10 years!
What You’ll Need:
- Index cards (Over 360)
- Scrap-booking paper
- Glue
- Scissors
- Pen
- Wood
- Paint
- Wood putty
First I started making the monthly cards. I wanted them to stand taller than the
regular index cards so I added some extra length. I fitted the scrap-booking paper
to the same width of the index cards, snipped and then glued them on. Super easy!
Second I needed a box.
This is where my handy hubby came in.
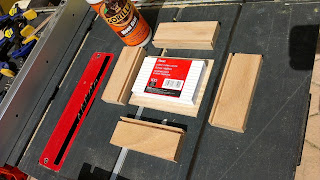
He helped me fabricate a wooden box using left over scraps from another
project. We measured for the cards to
fit perfectly into the inside. To create
a bottom we cut slots in all four sides and slipped in a thin piece of wood as
the base. It’s all held together with
some wood glue. Let dry for awhile. Fill in any holes with woody putty, sand afterwards.
Third I needed a splash of color. Glidden a few years ago was offering free
samples and I took full advantage!
Peacock Blue was the one!
Four Fill the box with memories.


